This is a beginner practice project using python language. By this, the use of the Tkinter package will be learned by the python language reader. You have to install the Tkinter package before running the below code of the Alarm clock project. The installation process of the Tkinter package is defined below.
How to install Tkinter in windows and Linux OS?
# for pip3 in windows, write it in cmd:
pip3 install tk

# for python3 version in linux, write in cmd:
sudo apt-get install python3-tk


# for pip and windows, write in cmd:
pip install tk
The Tkinter library is used in this project as the user interface (to add buttons, text, options, and others). The code is so simple. The traditional alarm clock code is fitted to the user interface.
Code for "A simple Alarm Clock using Python | cool python project"
# Importing Required Packages
from tkinter import *
import datetime
import time
import winsound
from threading import *

# Use Threading to set the time gap
def Threading():
   # Setting the time from the Set_Alarm() function
   t1=Thread(target=Set_Alarm)
   t1.start()


def Set_Alarm():
   # Infinite Loop
   # This loop will run to the background of the OS
   while True:
      # Set Alarm time
      set_alarm_time = f"{hour.get()}:{minute.get()}:{second.get()}"

      # Wait for one seconds
      time.sleep(1)

      # Get current time
      current_time = datetime.datetime.now().strftime("%H:%M:%S")
      print(current_time,set_alarm_time)

      # Check whether set alarm is equal to current time or not
      if current_time == set_alarm_time:
         print("Time to Wake up")
         # Set the alarm sound
         # You can change it
         # just put sound file where this python file exit and rename the file
         winsound.PlaySound("sound.wav",winsound.SND_ASYNC)

if __name__=='__main__':
   # Create Object #initialize tkinter
   tk_user_interface = Tk()

   # Set geometry (The size of the window)
   tk_user_interface.geometry("450x250")
   tk_user_interface.title("Simple Alarm clock")

   # Add Labels, Frame, Button, Option menus in the TK() interface
   Label(tk_user_interface, text="Alarm Clock", font=("Helvetica 25 bold"), fg="red").pack(pady=10)
   # Setting the font and text style
   Label(tk_user_interface, text="Set Time", font=("Helvetica 17 bold")).pack()

   frame = Frame(tk_user_interface)
   frame.pack()


   hour = StringVar(tk_user_interface)
   hours = ('00', '01', '02', '03', '04', '05', '06', '07',
         '08', '09', '10', '11', '12', '13', '14', '15',
         '16', '17', '18', '19', '20', '21', '22', '23', '24'
         )
   hour.set(hours[0])
   hours_ui = OptionMenu(frame, hour, *hours)
   hours_ui.pack(side=LEFT)


   minute = StringVar(tk_user_interface)
   minutes = ('00', '01', '02', '03', '04', '05', '06', '07',
         '08', '09', '10', '11', '12', '13', '14', '15',
         '16', '17', '18', '19', '20', '21', '22', '23',
         '24', '25', '26', '27', '28', '29', '30', '31',
         '32', '33', '34', '35', '36', '37', '38', '39',
         '40', '41', '42', '43', '44', '45', '46', '47',
         '48', '49', '50', '51', '52', '53', '54', '55',
         '56', '57', '58', '59', '60')
   minute.set(minutes[0])
   minutes_ui = OptionMenu(frame, minute, *minutes)
   minutes_ui.pack(side=LEFT)


   second = StringVar(tk_user_interface)
   seconds = ('00', '01', '02', '03', '04', '05', '06', '07',
         '08', '09', '10', '11', '12', '13', '14', '15',
         '16', '17', '18', '19', '20', '21', '22', '23',
         '24', '25', '26', '27', '28', '29', '30', '31',
         '32', '33', '34', '35', '36', '37', '38', '39',
         '40', '41', '42', '43', '44', '45', '46', '47',
         '48', '49', '50', '51', '52', '53', '54', '55',
         '56', '57', '58', '59', '60')
   second.set(seconds[0])
   seconds_ui = OptionMenu(frame, second, *seconds)
   seconds_ui.pack(side=LEFT)


   # Setting submit button in the user interface
   Button(tk_user_interface, text="Set Alarm", font=("Helvetica 15"), command=Threading).pack(pady=20)
   # All things setup
   # Now run the main function of Tkinter
   tk_user_interface.mainloop()
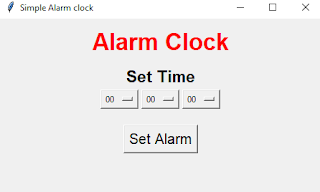
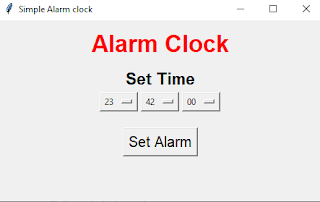
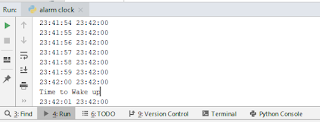
Some screenshots of this project
1. Choose a time from option menus.
2. Hit the 'Set Alarm' button.
3. The code will run infinitely until the alarm time has been finished. See the console that the code gives output.
Tags:
Python


